Here is a banner I made back in November 2013 using Graphic 45's 12 Days of Christmas paper and regular tag album. I had a blast designing this banner, as this was just the prettiest darn Christmas paper I had ever seen. The lovely ladies at Graphic 45 kindly shared this project on the blog this week!
If you don't have the particular Spellbinders die that I used for my banner, you can always substitute for another. :) This was a pretty simple project to put together, and of course, you can always swap out the holiday paper for anything else! You know what would be really pretty? The new Come Away With Me line by Graphic 45. Think A Ladies' Diary meets Typography and Transatlantique. Oh, and a little bit of the June cut outs from Place In Time. Yep, I'm pretty sure the new line was inspired by all of these Graphic 45 greats.


Step 5. Take your My True Love paper, Christmas carol side up, and cut (8) 3” x 4” pieces. Use a die cutting machine to cut the third largest shape from the Spellbinders Decorative Labels Eight die. Do this for all 8 pieces.
 Step 6. Take
your Drummers Drumming paper, stripe side up, and cut (8) 2.5” x 3.5” pieces.
Use a die cutting machine to cut the second smallest shape from the
Spellbinders Labels Eight die onto each piece. Do this for all 8 pieces.
Step 6. Take
your Drummers Drumming paper, stripe side up, and cut (8) 2.5” x 3.5” pieces.
Use a die cutting machine to cut the second smallest shape from the
Spellbinders Labels Eight die onto each piece. Do this for all 8 pieces.

Step 7. Take your My True Love die cut pieces and apply some Xyron glue and glitter to the outside edges, such as Donna Salazar’s Fairy Dust glitter in Mixed Berries.


Step 10. Fussy cut the following images from your Calling Birds paper.

Step 11. Fussy cut the following images from your Turtle Doves paper.

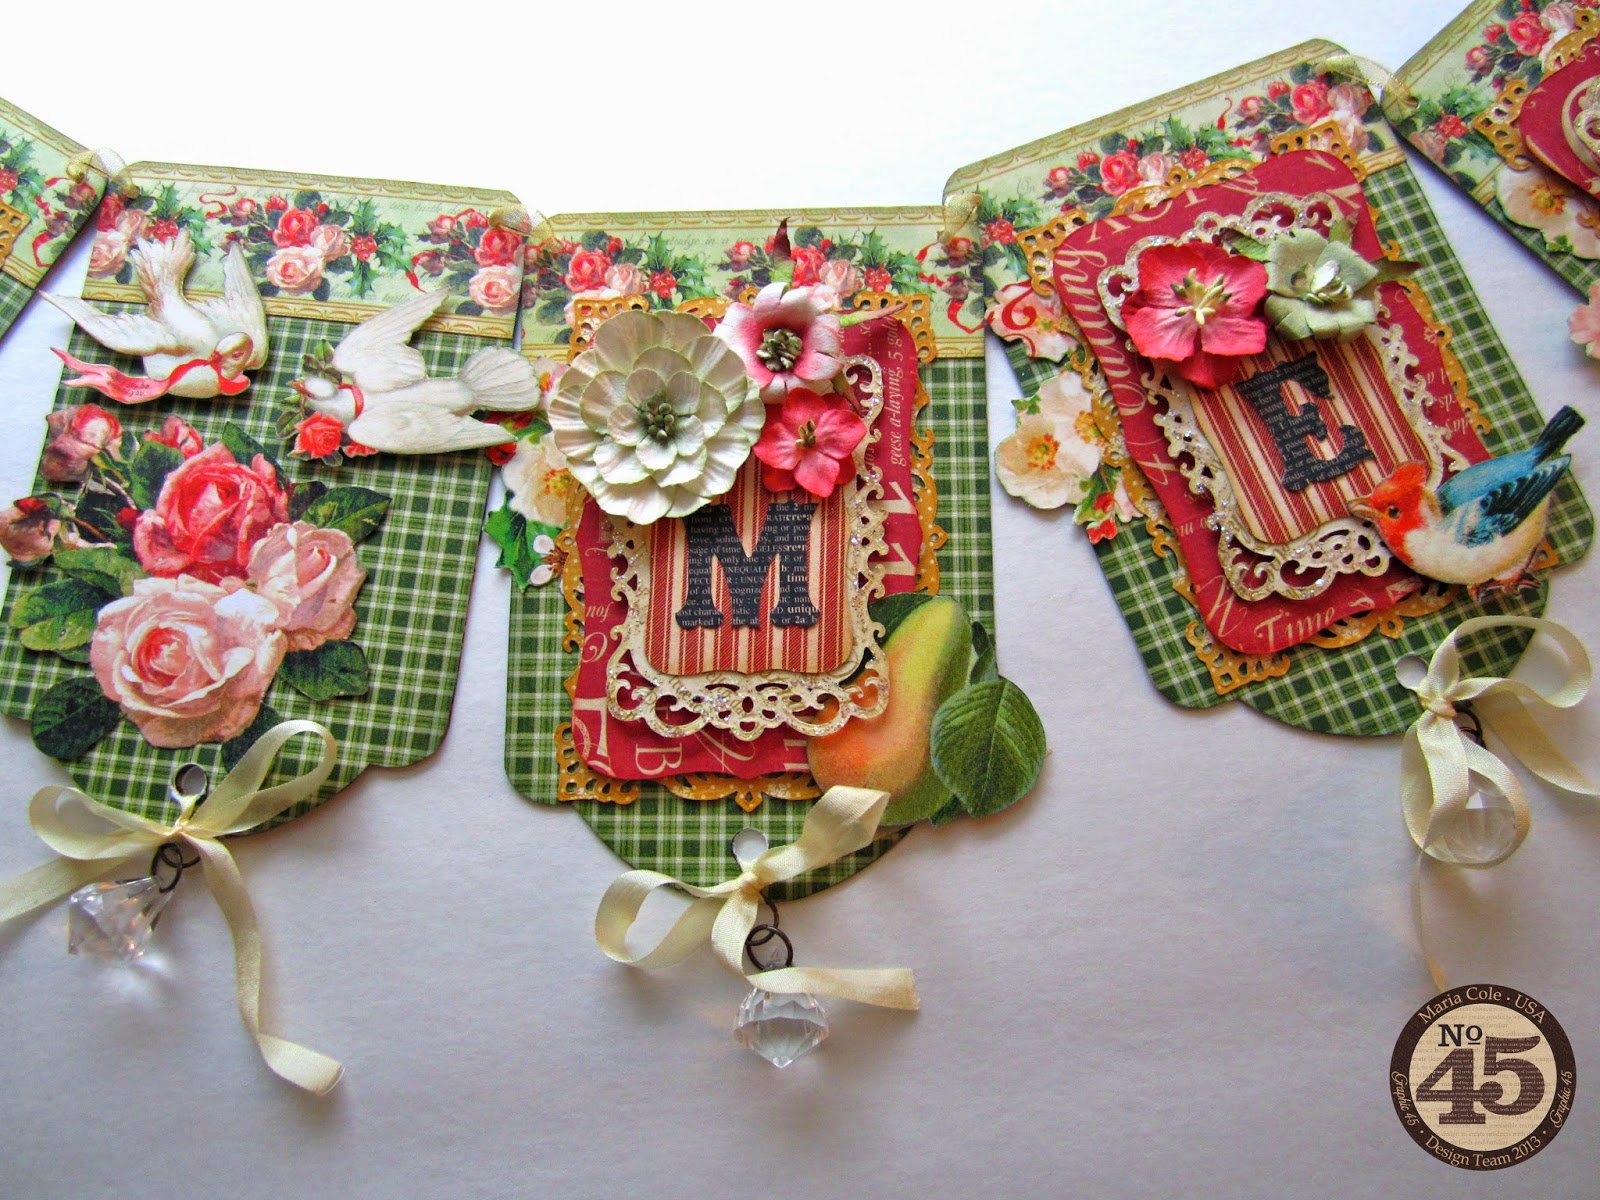
Step 12. For Tag #1, adhere some fussy cut flowers under your yellow paper. Adhere yellow paper. Attach red paper with foam dots. Attach Christmas carol paper with foam dots. Adhere red stripe paper. Attach the letter “B” from your Graphic 45 Alphabet Stickers. Adhere Petaloo flowers, then bird.

Step 13. For Tag #2, adhere some fussy cut flowers under your yellow paper. Adhere yellow paper. Attach red paper with foam dots. Attach Christmas carol paper with foam dots. Adhere red stripe paper. Attach the letter “E” from your Graphic 45 Alphabet Stickers. Adhere Petaloo flowers, then bird.

Step 14. For Tag #3, adhere fussy cut flowers. Attach turtledoves with foam dots.


Step 16. For Tag #5, adhere some fussy cut flowers under your yellow paper. Adhere yellow paper. Attach red paper with foam dots. Attach Christmas carol paper with foam dots. Adhere red stripe paper. Attach the letter “E” from your Graphic 45 Alphabet Stickers. Adhere Petaloo flowers, then bird.

Step 17. For Tag #6, adhere some fussy cut flowers under your yellow paper. Adhere yellow paper. Attach red paper with foam dots. Attach Christmas carol paper with foam dots. Adhere red stripe paper. Attach the letter “R” from your Graphic 45 Alphabet Stickers. Adhere Petaloo flowers, then hen.

Step 18. For Tag #7, adhere some fussy cut flowers under your yellow paper. adhere some fussy cut flowers under your yellow paper. Adhere yellow paper. Attach red paper with foam dots. Attach Christmas carol paper with foam dots. Adhere red stripe paper. Attach the letter “R” from your Graphic 45 Alphabet Stickers. Adhere Petaloo flowers, then bird.

Step 19. For Tag #8, adhere some fussy cut flowers under your yellow paper. Adhere yellow paper. Attach red paper with foam dots. Attach Christmas carol paper with foam dots. Adhere red stripe paper, then pears. Attach the letter “&” from your Graphic 45 Alphabet Stickers. Adhere Petaloo flowers.
 Step 20. Tie
a bow through the bottom of each tag using your (12) pieces of 12” long ribbon.
Attach crystal pendants using jump rings. Take your 5’ of gold ribbon and
thread it through the holes you punched in each tag.
Step 20. Tie
a bow through the bottom of each tag using your (12) pieces of 12” long ribbon.
Attach crystal pendants using jump rings. Take your 5’ of gold ribbon and
thread it through the holes you punched in each tag.

If you don't have the particular Spellbinders die that I used for my banner, you can always substitute for another. :) This was a pretty simple project to put together, and of course, you can always swap out the holiday paper for anything else! You know what would be really pretty? The new Come Away With Me line by Graphic 45. Think A Ladies' Diary meets Typography and Transatlantique. Oh, and a little bit of the June cut outs from Place In Time. Yep, I'm pretty sure the new line was inspired by all of these Graphic 45 greats.
Supplies
(3) 12 Days of Christmas Joyeaux Noel
(2) 12 Days of Christmas Golden Rings
(2) 12 Days of Christmas Christmas Rose
12 Days of Christmas My True Love
12 Days of Christmas Drummers Drumming
12 Days of Christmas Turtle Doves
12 Days of Christmas Calling Birds
Graphic 45 Regular Tag Album
Graphic 45 Alphabet Stickers
Spellbinders Labels Eight die
Spellbinders Decorative Labels Eight die
Petaloo Mixed Blossoms – Antique Green
Petaloo Mixed Blossoms – Antique Red
May Arts ribbon – (12) 12” cream silk ribbon
May Arts ribbon – 5’ feet gold ribbon
Donna Salazar Fairy Dust Glitter – Mixed Berries
Xyron Glue Stick
(12) crystal pendants
Instructions
Notes: All Graphic 45
papers are 12” x 12”. You are free to ink all edges with light green ink before
adhering.
Step 1. Take
one of your tags and use it as a pattern to trace (8) upside down tags onto the
green side of your Swans A Swimming paper. You can fit 6 shapes on one sheet
and 2 shapes on the other. Cut out tags and apply a hole punch or small circle
punch.
Step 2.
Locate your (3) Joyeaux Noel papers, border side up. Trim off the border that
has the roses in it. With this flower border, cut (3) 3 7/8” long strips. Flip
the bottom scrap over to reveal the red pattern; trace (3) tag shapes per
sheet. You will only need (8) tag shapes; cut these out and punch holes.
Step 3. Take
both sheets of your Golden Rings paper, gold side up, and cut (8) 4” x 6”
pieces. Then, use a die cutting machine to cut out the second largest shape
from the Spellbinders Decorative Labels Eight die. Do this for all 8 pieces.
Step 4. Take
both sheets of your Christmas Rose paper, red side up, and cut (8) 3.5” x 5”
pieces. Use a die cutting machine to cut the third largest shape from the
Spellbinders Labels Eight die. Do this for all 8 pieces.
Step 5. Take your My True Love paper, Christmas carol side up, and cut (8) 3” x 4” pieces. Use a die cutting machine to cut the third largest shape from the Spellbinders Decorative Labels Eight die. Do this for all 8 pieces.
Step 7. Take your My True Love die cut pieces and apply some Xyron glue and glitter to the outside edges, such as Donna Salazar’s Fairy Dust glitter in Mixed Berries.
Step 8.
Adhere (6) green tag patterns to all (6) of your tags. Adhere (6) red tag
patterns to the back of your tags. With your remaining green and red tags, glue
them together so you have (2) additional tags. Adhere all the flower borders to
the top of your tags, then punch a small hole in the upper left and right
corners. Arrange all the layering pieces for each of your (8) tags per photo,
but do not adhere yet.
Step 9.
Gather all of your Petaloo flowers; if you don’t have these exact ones, you can
use similar ones.
Step 10. Fussy cut the following images from your Calling Birds paper.
Step 11. Fussy cut the following images from your Turtle Doves paper.
Step 12. For Tag #1, adhere some fussy cut flowers under your yellow paper. Adhere yellow paper. Attach red paper with foam dots. Attach Christmas carol paper with foam dots. Adhere red stripe paper. Attach the letter “B” from your Graphic 45 Alphabet Stickers. Adhere Petaloo flowers, then bird.
Step 13. For Tag #2, adhere some fussy cut flowers under your yellow paper. Adhere yellow paper. Attach red paper with foam dots. Attach Christmas carol paper with foam dots. Adhere red stripe paper. Attach the letter “E” from your Graphic 45 Alphabet Stickers. Adhere Petaloo flowers, then bird.
Step 14. For Tag #3, adhere fussy cut flowers. Attach turtledoves with foam dots.
Step 15. For
Tag #4, adhere some fussy cut flowers under your yellow paper. Adhere yellow
paper. Attach red paper with foam dots, then adhere pear. Attach Christmas
carol paper with foam dots. Adhere red stripe paper. Attach the letter “M” from
your Graphic 45 Alphabet Stickers. Adhere Petaloo flowers.
Step 16. For Tag #5, adhere some fussy cut flowers under your yellow paper. Adhere yellow paper. Attach red paper with foam dots. Attach Christmas carol paper with foam dots. Adhere red stripe paper. Attach the letter “E” from your Graphic 45 Alphabet Stickers. Adhere Petaloo flowers, then bird.
Step 17. For Tag #6, adhere some fussy cut flowers under your yellow paper. Adhere yellow paper. Attach red paper with foam dots. Attach Christmas carol paper with foam dots. Adhere red stripe paper. Attach the letter “R” from your Graphic 45 Alphabet Stickers. Adhere Petaloo flowers, then hen.
Step 18. For Tag #7, adhere some fussy cut flowers under your yellow paper. adhere some fussy cut flowers under your yellow paper. Adhere yellow paper. Attach red paper with foam dots. Attach Christmas carol paper with foam dots. Adhere red stripe paper. Attach the letter “R” from your Graphic 45 Alphabet Stickers. Adhere Petaloo flowers, then bird.
Step 19. For Tag #8, adhere some fussy cut flowers under your yellow paper. Adhere yellow paper. Attach red paper with foam dots. Attach Christmas carol paper with foam dots. Adhere red stripe paper, then pears. Attach the letter “&” from your Graphic 45 Alphabet Stickers. Adhere Petaloo flowers.
3 comments:
Came across this delightfully beautiful banner on someone's Pinterest board...so happy that I came here to look at all the details. You are quite a talented paper artist! Thanks for the close up photos of each tag. The instructions are easy to follow. Nice project!
Lovely work and detailed photos/instructions. Thanks for sharing your talent.
.. Just browsing the internet for G45 projects - as you do - and came across your fabulous banner. Its only just spring here in the UK, but I want to make a similar one, now!! Thank you for sharing.
Post a Comment