Tuesday, December 27, 2011

Gentleman-ly organization

[1/7/12 Update: My boxes were featured on Graphic 45's blog!! Thank you so much, Graphic 45!]

Here is another Christmas present I made recently for one of the special guys in my life. We'll call it "gentleman-ly organization" because it's masculine and functional, versus just another cute and girly crafty project.


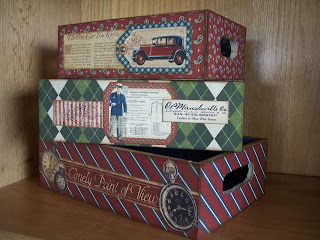
I picked up a set of unfinished wooden nesting trays at Walmart a while back. I always thought they'd make for a great gift idea but hadn't come across the right opportunity yet. (Click here to view the product info and measurements.) Well, once I received my Graphic 45 Proper Gentleman paper, the idea came to mind to create nifty-looking vintage trays that double as an organizing system. (Important mail, cellphone charger, keys, etc.)   

Since I wanted the trays to be as functional as possible, I kept my design as simple and as flat as possible. This is especially helpful when you stack all the trays inside one another:


Here is a view of the opposite side of the trays:


Now. In the event my gift recipient opted for FASHION over FUNCTION, I decided to dress up the inside bottom of each tray. 


In this case, he could display the trays as if they were shadowboxes:


If you look closely, you can see my shadow in the last picture. So embarrassing. Well, that's it, folks - thank you for looking and if you're at the store, don't hesitate picking up wooden crafts such as these! They are pretty cheap and you can alter the heck out of them ... if it wasn't for functioning organization trays, I would've played quite a bit more with these. This will probably be my last post for 2011 as I'll be on another mini-journey. May you all be blessed and have a safe and fun New Year's!

-Maria

Supplies:

Graphic 45 - A Proper Gentleman paper
Gathered Twig Distress Stain
Plaid Nesting Trays set
Copper and black brads

Sunday, December 25, 2011

Girlie/Grungy little mini book

What do you give the person who has everything? Something handmade and from the heart, that's what! For this special lady, I put together a quick little mini book (it measures about 5" high by 3" wide) that's small in size but huge in the "meaningful" department. Basically, it's an invitation for a girl's day out - because nothing is better than spending quality time with the ones you love.


This mini book is a 4-page album made from some white corrugated paper, Prima flowers, Prima paper, and the usual Maria favorites: pearls, crochet ribbon, and tulle! The corrugated paper came from a pizza box and the Prima paper I used came from one piece of paper that I found while checking out Stacy's Scrap Shack in Lincoln City a few weeks ago. The tulle, twill ribbon, pearls, Tim Holtz Vintage lace die, Distress Stain, Prima flowers, and amazing Distrezz-It-All are all from my Paper Mermaids stash, which will grow even bigger thanks to the amazing gift certificate that my sweet dad-in-law and mom-in-law got me for Christmas! Woo hoo! Now, back to our regular programming ... 

Here are the second and third pages: 


Fourth and fifth pages:


And the back:


I punched two holes in each page, then bound my book together using twill ribbon. I added some tulle for some added frill.


My mini book is quite small ... it's just a tad bigger than my cellphone.


Did I mention how much I love my Distrezz-It-All? Just look at all the neat texture it creates:


Thanks for looking! Up next, another handmade Christmas present using my Proper Gentleman paper from Gloria Stengel's December blog candy ... stay tuned!

Merry Christmas! (Tutorial, too!)

May God bless all of you and fill you with his deep, everlasting love today and every day! 
And may you extend that same great love to everyone in your life. God loved us before we loved Him - what a tremendous gift and great example for us to follow! Let's show that same love to the world through kindness, friendship, and of course, creativity!


With that said, here is a little tutorial on making these tattered flower ornaments! (Look a little familiar? I used one of these for my last 12 Tags of Christmas undertaking. :)

Supplies: 


Old cardboard - preferably of the cereal box kind of thickness
Canvas
Burlap
Tulle
Brown ink, such as Tim Holtz's Walnut Stain or Gathered Twig Distress Stain
Baker's twine, preferably in red and white
Tattered Florals die (for this ornament, I used the largest flower)
Tattered Angels Glimmer Mist in Pearl
1/16" hole punch 
Tissue Tape

The cardboard base
1. Take your cardboard and cut (6) big flowers using the Tattered Florals die. 
2. Distress the edges of your cardboard flowers with Distress Stain and an emery board, or distress tool.
3. Crumple each cardboard flower by hand until each one has a slightly weathered look. 
4. Using a 1/16" hole punch, punch a hole on the end of one petal per flower. (This is where you will string your baker's twine through.) 
5. Punch a 2/8" hole in the center of each cardboard flower. Set aside.


The canvas middle
6. Take your canvas and cut out 12 big flowers. 
7. Lightly distress the edges of your canvas flowers with your fingers, scissors, or other distress tool. Ink the edges with brown Distress Stain. 
8. Punch or cut a 2/8" hole in the center of each canvas flower. Since this is fabric and it has lots of fibers, you may need to use your scissors to create cuts as a hole punch doesn't always work. 
9. Make (6) stacks of canvas flowers so that you have (2) canvas flowers per stack. 
10. Place each stack of canvas flowers onto a cardboard flower. Place each stack of flowers in a cardboard box and spray with Pearl Glimmer Mist. Let dry.


The burlap and tulle center
11. Take your burlap and cut 6 circles, about 3 1/2" in diameter. Don't try to make them perfect - part of the fun is making them a little lopsided as it produces better results! 
12. For each burlap circle you cut, fold the circle in half, then roll. Glue the bottom of your burlap together and use a paperclip to help the glue bond faster to your burlap. Remove paperclip when glue has dried, then set aside.
13. Cut your tulle into (6) 5" long pieces. Take a piece of tulle and fold it in half. Place one of your rolled up burlap pieces and place in the middle of your tulle. Do this for each piece of tulle and burlap. These are the center "blossoms" in your flower. 


Assembling your flower
14. Take each tulle-wrapped burlap and stick it through each stack of canvas and cardboard flower stack. 
15. Part of the tulle-wrapped burlap will be sticking out of the back of your flower, so just cover it with some Tissue Tape. 
16. Cut (6) pieces of 9" long baker's twine.
17. Run the baker's twine through the 1/16" hole you punched in each cardboard flower and tie.  


There you have it! Merry Christmas, everyone!

Thursday, December 22, 2011

December 2011 Girlie Grunge Challenge

Hello!

Boy, I feel like I haven't blogged in a month! The past couple of weeks I've been in Portland and Seattle visiting family and friends, not to mention, fighting off this icky head cold. So I haven't had a whole lot of time for papercrafting ... but I did manage to create two projects in one: a "little-piece-of-home" for my sister Therese (who very recently moved to Seattle) and my entry for Donna Salazar's December 2011 Challenge.

The requirements for the December challenge are to create a card, layout, tag, or altered project use denim, glitter, a Donna Salazar product, and two pictures (if creating a layout.) Since my sister recently moved to Seattle, and I want her to have a little piece of nostalgia and familiarity with her, I thought I'd focus the challenge on a layout of the two of us. I ended up using the Creative Scrappers sketch #185 as a starting point for my layout. (Thanks again, Natasha!)

Here is my layout:


First, I distressed the edges of a piece of cardstock and used it as the base for my layout. I then took a piece of SEI paper from Paper Mermaids and ran it through my Distrezz-It-All, then glued on top of the cardstock. My Distrezz-It-All (DIA) was an early Christmas present my husband got me from Paper Mermaids. This tool is AMAZING! I love the ripped up, grungy, tattered effect it gives your projects. I've been drooling over one ever since I started following the Girlie Grunge Ning, as well as learning more about Donna and her playful style!

I cut out flowers from another piece of SEI paper, then rolled some of the edges to give the flowers more of a dimensional look.


The big purple flower and smaller dark purple flower were made with my DS Rose Creations die. I dusted the edges of the larger purple flower with glitter, which I'm sure has transferred onto my sister by now. (Just kidding, Therese!) The other flowers on my layout include a purple Mulberry Street flower and a tiny Prima flower, both leftovers from my Paper Mermaids stash.


Now, for the denim ... I cut up the hem of a pair of jeans, rolled them up, and turned the piece into a rosette.


Next, I took several pieces of denim, cut each one into a circle shape, then folded into a flower shape. I applied some Smooch pearlized ink (from the blog candy I won recently) to my denim flowers, then glued them to my page to create a cascading effect.


I cut a few strips of denim, cut and ripped up the edges, then glued onto my layout.

The sentiment was created using my Tim Holtz "Vintage Lace" die and his "Once Upon a Time" die, a recent Christmas present from Portland. I applied some glitter on the paper lace strip below my sentiment.


It definitely helped having a sketch to work from. I must admit, it made creating a 12x12 layout less intimidating. I think I'll do more of these in 2012. Till then, thank you for looking, and have a wonderful day!

Supplies:

SEI "Couture" paper
DS Zutter Distrezz-It-All
DS Rose Creations die
Smooch pearlized ink
Tim Holtz Vintage Lace die
Tim Holtz Once Upon a Time die
Walnut Stain Distress Ink
Mulberry Street flower
Prima flower
Restaurant doily (Save these!!)

Monday, December 12, 2011

Early Christmas present

Today I got my blog candy prize from the talented Gloria Stengel!! I cannot believe how much amazing stuff was inside ... I feel like the little boy from a Christmas Story after getting his rifle! ;) She even included her gorgeous gift card she made, along with a Christmas card, just for me! Woo hoo, I cannot wait to play with all this fabulous stuff!! Thank you again, Gloria!!

12 Tags of Christmas - Tag #12

Here we are, the last day of Tim Holtz's 12 Tags of Christmas ... and my goodness how Tim closed up his inspiring festivity with a bang! Tim's tag is over-the-top awesome and incorporates lots of fun techniques that I know I'll be using over and over. Check out his final amazing tag here.

First off, I'm excited that Tim used the Vintage Lace die. I pointed out in my 3rd tag's post the many different shapes you can get from this little die, and so did Tim! Obviously the King of Craft knew what he was doing when he designed this versatile die. And that's what I love ... products and techniques that have so many functions and possibilities.

Well, I have to warn you, my tag is on the girlie side ... Ready? Okay, here you go:


I used my Brackets On The Edge die to create a towering piece behind my sassy Salvage flight attendant sticker. I wish I took a picture of it before I covered it. When I'm on a roll, it's hard for me to just stop and take a picture sometimes. (Something to work on in 2012.) Self-deprecating comments aside ... I inked the piece with Rusty Hinge (my favorite Distress Ink color) and Scattered Straw. Copper Stickles on top. I created my angel wings using grungepaper, Forest Moss Distress Stain, Walnut Stain Distress Ink, a Martha Steward mini hole punch, Glossy Accents, and some Martha glitter. 


For my background, I embossed my tag with the Woodbricked Texture Fade folder, then painted over it with white acrylic paint. I used my Vintage Lace die but used one of the inverse patterns instead, as I used up the one on today's tag for my 3rd one when I created my snow flower. I used my Inkssentials pen to color over the die, then embossed it with some gold Ranger embossing powder. 


Since I don't have Tim's Tissue Wrap (yet--take note, Santa), I crumpled up some Tissue Tape and stuck it to both sides of my tag. I also crumpled up a couple pieces and made Tissue Tape rosettes. The bottom rosette has a fun Bo Bunny brad inside. I used another piece of Vintage Lace on the bottom of the tag as well. A jingle bell from my Salvage sticker collection is the image inside my fragment charm. 


My big girly/grungy flower was made with my Tattered Florals die using cardboard and canvas. I rolled up a piece of burlap and tulle and stuck these inside my flower. The petals were distressed with Gathered Twig. I then spritzed a bunch of Pearl Glimmer Mist over the flower but sadly you can't see the shimmer ... 


I have to say, the 12 Tags has been the greatest Christmas present! I've learned so many new techniques, met a lot of new friends (like you!), and have a surging well of ideas now to take into the new year. And Tim if you're reading this, thank you so much for inspiring us, showing us new ways to use your products, and for the amazing talent that you have. Thank you Mario as well for helping Tim put on such a great production! What a blessing and incredible gift from God that creativity is. 


Supplies: 

Bricked Texture Fade
Tissue Tape
Vintage Lace die
Tattered Florals die
Fragment Charms
Salvage Stickers
Distress Stain
Distress Ink
Brackets On The Edge die
Copper Stickles
Grungepaper
Inkssentials clear embossing pen

Sunday, December 11, 2011

Tim Holtz: 12 Tags of Christmas - Tag #11

Good morning! Are you sad that the 12 Tags are almost over?? I am, but I'm sooo grateful for all the new techniques that Tim has taught us. I feel like I have a much better understanding of his products and how to use them. I think 2012 is going to be quite the creative year!

If you haven't checked out Tim's eleventh installment in his 12 Tag series, click here. His tag is so bright, cheery, and fun!

Since I don't have Tim's stamps, I ended up using a Santa stamp that my in-laws gave me and my trusty embossing pen. If you're in a pinch and need a sentiment but nothing you have will work, create your own with an Inkssentials embossing pen. Carol from Paper Mermaids turned me onto these bad boys! You get a black pen and a clear one. The black pen allows you to see what you're writing but I prefer the clear one. There's something alluring about not knowing what your image will look like until it's embossed. :)


I don't have Tim's shrink plastic so I ended up embossing a clear piece of packaging, similar to what he did with his fourth tag. To give my plastic snowflakes some dimension, I applied some Claudine Hellmuth Studio Gloss and Aqua Stickles.


Well, that's all, folks! Thanks for looking, and as always, thank you for your sweet and encouraging comments! I just love how many new friends I've made across the globe, simply from this amazing tag challenge!


Supplies:

Movers & Shapers Carved Ornament die
Broken China, Chipped Sapphire, Barn Door, Peeled Paint, & Black Soot Distress Ink
Aqua Stickles
Snowflake texture fade from Tim's Joy set
Tattered Angels Glimmer Mist in Pearl
Claudine Hellmuth Studio Gloss
Inkssentials Clear embossing pen
Ranger black embossing powder

Saturday, December 10, 2011

12 Tags of Christmas - Tag #10

Sheesh, we're two hours from Tim's next tag, and I barely finished today's!

If you're following along with the challenge, you've obviously seen Tim's festive facet tag. I love the look of facets and I love his musical stamp, but I am seriously lacking those (and many other) Tim products, so I had to improvise with what I have on hand.

I didn't get to create this tag until tonight, so please forgive me for the dark, blurry photos! Here is my tag:


I embossed my background with the Bricked Texture Fade folder. I figured an embossed background is always better than no background!! You can see a little bit of the bricks here: 


Instead of facets, I used my Movers & Shapers hearts with some wings made from Autumn Gatherings. The piece behind my hearts is a Movers & Shapers label that I cut out using corrugated cardboard.


I don't have Tim's alphas, so instead I used some Salvage stickers of his for the sentiment. Here is a really dark photo ... 


Thanks for looking!! Now, off to check out some of your creations ... :)

Supplies:

Movers & Shapers Labels
Movers & Shapers Hearts
Forest Moss Distress Stain
Black Soot, Gathered Twig, & Barn Door Distress Ink
Ranger gold embossing powder
Bricked Texture Fade embossing folder
Salvage Stickers
Urban Grunge stamp

Friday, December 9, 2011

Tim Holtz: 12 Tags of Christmas - Tag #9

Good morning! Forgive me for rushing through this, as I'm rushing off to work ...

Tim's ninth tag uses a really neat technique that I definitely plan on using on lots of future projects! Check out his blog to see his latest beautiful tag.

Here is my rendition of Tim's tag:


My tree is made from Tim's Bricked & Woodgrain embossing set. I applied some crackle paint for an aged frosty look. My festive bunch is actually made from my Autumn Gatherings die and has an icy application of liquid pearls here and there. I don't have clear embossing powder (yet) so I used Tim's technique on these Movers & Shapers butterflies instead:


For the sentiment, I wrote the word "Peace" with my clear Ranger embossing pen and applied Tim's embossing technique to it. Glossy accents on top and secured by one of Tim's metal plate holders.


I know I went a little overboard with embossing my sentiment ... I tried to get a salt and pepper-ish type of effect but it got a little muddled. Er ... For my background, I embossed my tag with my Regal Flourish texture fade folder, another gorgeous one of Tim's.


That's all folks, have a wonderful day!! When I get home from work I will check out your creations and see what you've done with today's tag!