Sunday, February 19, 2012

Graphic 45 goodies!!

So I am quite excited - my Graphic 45 prize packs from G45's CHA Sneak Peeks arrived!! If you're reading this, thank you so much, Graphic 45!! It seriously felt like Christmas today, I feel so blessed to have been one of the very lucky random winners from last month's giveaway!


I even got a button! Sooo cute! I am proudly displaying my Graphic 45 treasure in my craft room. :)


Unfortunately, I didn't check the mail until this afternoon - so by the time I finished my Little Darlings project, it was too dark for photos. I'll just have to share it tomorrow! Good night, all! 

Friday, February 17, 2012

Graphic 45 - Random Crafts of Kindness

[2/24/12 Update: My card was featured on Graphic 45's blog! Thank you, Graphic 45!!]

Hi! I am really happy because Graphic 45 is celebrating "Random Acts of Kindness" week by hosting their "Random Crafts of Kindness" challenge. To participate, all you need to do is create a handmade craft using Graphic 45 products for someone special this week!

The timing couldn't be more perfect, as I've been meaning to make some lemon bars for the staff at our townhome community. They have been so helpful and responsive as my husband and I have been settling in the past few weeks. Being the sugar fiend that I am, a handmade thank you card will also help in showing our appreciation -- just in case we're missing a lemon bar or two by the time our thank you package is delivered! ;)

Since I'm making lemon bars, I thought I'd create a card using the color yellow. I scoured through my Graphic 45 paper collections and chose Fashionista. I love this paperline because it's so glamorous, and not to mention, it includes a pretty blue and yellow polka dot pattern that I found works perfectly with my idea.


My background was created using a Tim Holtz Texture Fades embossing folder and Distress Ink. I cut out the main image, glued it onto some navy corrugated paper, then attached it using pop dots for dimension. All of the lovely red flowers came from another Fashionista page. I cut them out and alternated gluing them and using pop dots for a layered look. 


I used Graphic 45 Flower Staples to complete the flower bunch in the corner. I can't wait to get my hands on more G45 Staples, especially the ones that were introduced during CHA.  


I stamped my sentiment onto some cardstock, then cut it using one of my Spellbinders dies. 


Now it's time for lemon bars! I really hope the staff likes them, along with their card. :) Thank you for looking, have a great day!


Supplies: 

Graphic 45 - Fashionista paper
Graphic 45 Flower Staples
Tim Holtz Texture Fades - Springtime Background folder
Spellbinders - Labels 4 die
Stamping Scrappings - Coordinating Spellbinders Stamp 
Distress Stain
Pearls

Tuesday, February 14, 2012

Valentine's Day in Wonderland Tutorial

Happy Valentine's Day, Crafty Friends!

I have a V-Day project and tutorial to share with you today ... it's quite the tale of deep passion and obsession ... trickery and lies ... and redemption. :)

During Christmas, my husband and I both received a mini box of chocolates in our stockings. I knew this - but Scott did not.


You see, I'm addicted to sweets and it is my duty to consume at least one thing everyday that contains sugar. So after I devoured my chocolates, I scoured my husband's Christmas stocking and was pleasantly surprised to feel the rectangle-shaped package in my hands. :)

Oops.
He still doesn't know about Santa's good intentions. (He will pretty soon, though.) But the empty little boxes that I've hidden have racketed my conscience louder than the beating heart from The Raven. So, I thought I would redeem his empty box of chocolates ... and turn it into an altered project I'd like to call "Valentine's Day in Wonderland." 


I made the rosette using the candy liners ... some may consider this taunting, I see it as saving the environment. :)


The inside is not completely devoid of anything sweet ... there are two hearts, one representing my love of sweets, the other representing my love for my other half! Do you think I'm off the hook for my crime? Or will it be ... off with my head?!


If you have empty candy boxes stashed away, why not redeem them and turn them into a gift for your special Valentine? Depending on where you live, you still have time! All right, let's get started with a quick tutorial.

Supplies:

Graphic 45 - Hallowe'en in Wonderland 8x8 paper (another amazing goodie from Gloria Stengel's December blog candy--thank you again!!)
Graphic 45 - Chipboard Button Staples
Black Soot Distress Ink
Gold Paint Dabber
Movers & Shapers - Mini Hearts die
Grungepaper Elements - key
Prima flowers
Crochet ribbon
Feathers
Pink brad

The box

1. Remove the lid from your box. Measure the length and width from side to side and write down the measurements. Do this for the bottom of your box as well. You'll see in the picture that the top of my box measures about 3.5". Both sides measured 1" each so the total length I measured was 5.5".


2. I chose the "Hallowe'en in Wonderland" design for my lid because of the cute devilish hearts. (If you look closely, you can see a little set of horns and a tail for each heart.) Cut your paper to the measurements you recorded for both the lid and the bottom. Then, score your paper based on how long the edges are. When you have scored all four sides of your paper, (4) squares will be formed in each corner. Cut these squares out, then glue your paper to both pieces. 


I used "Curiouser and Curiouser" for the bottom.


3. Measure the inside of your lid and bottom, then cut alternating paper designs to place inside your box. Glue each piece and press firmly into your box. Don't worry if your paper sticks out a little - you can always sand it down so that the edges are nice and straight.


4. Grab your black ink and apply it to every corner and edge. 


The rosette

1. Grab 3 candy liners. (Feel free to add more if you want.) Pierce a hole into the center of your liners.


2. Place your brad into the center of your candy liners. Shape the liners by gently crumpling them with your fingers. 


You're done! However, you can always spritz them up with some Tattered Angels Glimmer Mist, Smooch Spritz, or Perfect Pearls Mist for some added shimmer. 

Adding elements

1. Using your die cutting machine, cut out (2) short hearts and (1) long heart from the Movers & Shapers Mini Hearts die. I chose "Curiouser and Curiouser" and "You're Late!" for the paper. Using the short hearts, glue one heart to the inside of your bottom piece. Attach the other short heart with pop dots to create some dimension. 


2. Glue your crochet ribbon onto your lid. 


3. Cut out an Alice card from "Jabberwocky". Attach candy liner rosette, feathers, Prima flowers, and Movers & Shapers long heart to your lid. Place a couple pop dots underneath your Alice card and attach. Take your grungepaper key, apply Gold Paint Dabber, then attach to your lid when dry. 


4. Tie some twine through your Graphic 45 buttons and attach to the sides of your lid. 


There you have it! An altered candy box for your sweetheart, using Graphic 45's whimsical "Hallowe'en in Wonderland" collection. Thank you so much for looking ... Happy Valentine's Day!

XOXO,
Maria

Monday, February 13, 2012

Grungy Monday 36

Happy Monday!

Today's challenge over at Linda's blog is to make a Valentine-themed project using at least one Tim Holtz product or technique. Just for participating, Simon Says Stamp will give one lucky winner a $25 shopping spree to their online store! Woo hoo!

I'm happy to have a Valentine's Day challenge, as I had a V-Day project that I had to put on hold once we learned we were moving last month. (I had a grungepaper heart, set of wings, some die cut letters, and some movers and shapers dies that I set aside for a card challenge.) For today's Grungy Monday challenge, I thought I'd keep all of those elements, but rather than produce a card with them, I thought it would be fun to do something new: a wall hanging!


I applied Picket Fence Distress Stain to the grungepaper wings and the heart. When the stain dried, I applied Crackle Paint over both elements. I then applied Fired Brick Distress Stain over the heart, then applied liquid pearls around the edge. 

The letters are from Tim's "Once Upon a Time" die. I inked them with black soot then glued over some crochet and twill ribbon. I glued a few little Prima flowers and then tore off a piece of tissue tape that matches this month's dates.


Tim's rosette is probably one of his most recognizable dies ... so of course, I had to add one!


To create my little lovebirds, all I did was cut an extra movers and shapers birdie and flip it over so that it looks like they're kissing! I used a combination of Distress Ink, Distress Stain, Alcohol Inks, and finally Crackle Paint to get their aged look. As for the birdcage, I applied a thick coat of Paint Dabber all over. I then attached my lovebirds using a little hoop earring. Since I love tulle so much, I tied a little tulle ribbon over the earring.


Well, thank you so much for stopping by! I'm sorry the photo quality on my projects lately has been sub-par. My new craft room receives a fraction of the natural light I used to get on the coast -- so I'm trying to figure out if I need to invest in a bunch of lights or certain kinds of lights or a new camera or both ... How about you, what are you doing currently to take quality photos? Any tips on how to take decent photos when you don't have much natural light? Thanks again for looking, have a LOVEly week, everyone!

Supplies:

Grungepaper elements
Grungepaper
Liquid Pearls
Distress Ink
Distress Stain
Mini Rosette die
Movers & Shapers mini bird & cage die
Once Upon a Time die
Prima flowers
Crackle Paint

Tuesday, February 7, 2012

Tropical Travelogue Valise & Passport

Hi!

Here's a Graphic 45 project that I put together today, using G45's Tropical Travelogue collection. Since there are so many gorgeous colors and patterns in this paper line, I thought I would focus this project on some of the pretty black and cream papers first. [BTW: I apologize for the dark/harsh lighting in these photos -- still working out the kinks in my new craft room.]


Tropical Travelogue is all about escaping to a warm, exotic place - so I thought it'd be fun to pack up my imaginary bags and passport and create this vintage travel set!


My valise was one of two wooden purses that I picked up from Creative Crafts in Corvallis, Oregon. I had painted it white several months ago in hopes of using it for a dear friend's nursery. Well, I felt the paint smell, while faint, wouldn't be good for her new baby - so I scrapped it and used the second, unfinished purse for my baby project. Ever since, I've had this white wooden purse hanging out in my craft room - until now. 

To create my valise, I first inked all the painted surfaces with Tim Holtz's Distress Ink. I then covered the front and back with Jungle Fever. I used three strips from Tiki Voyager to create a border and two accent pieces. The thin cream-colored strips are scraps from Tim Holtz's Vintage Lace die. The gorgeous cream-colored flower strip is from Petaloo. (I was so inspired by the Graphic 45 and Petaloo blog swap back in December, I just had to pick up as many different kinds of Petaloo flowers as I could!) I then attached a Bo Bunny trinket and a piece of Exotic Destination paper with an Idea-ology mini ball and chain set.


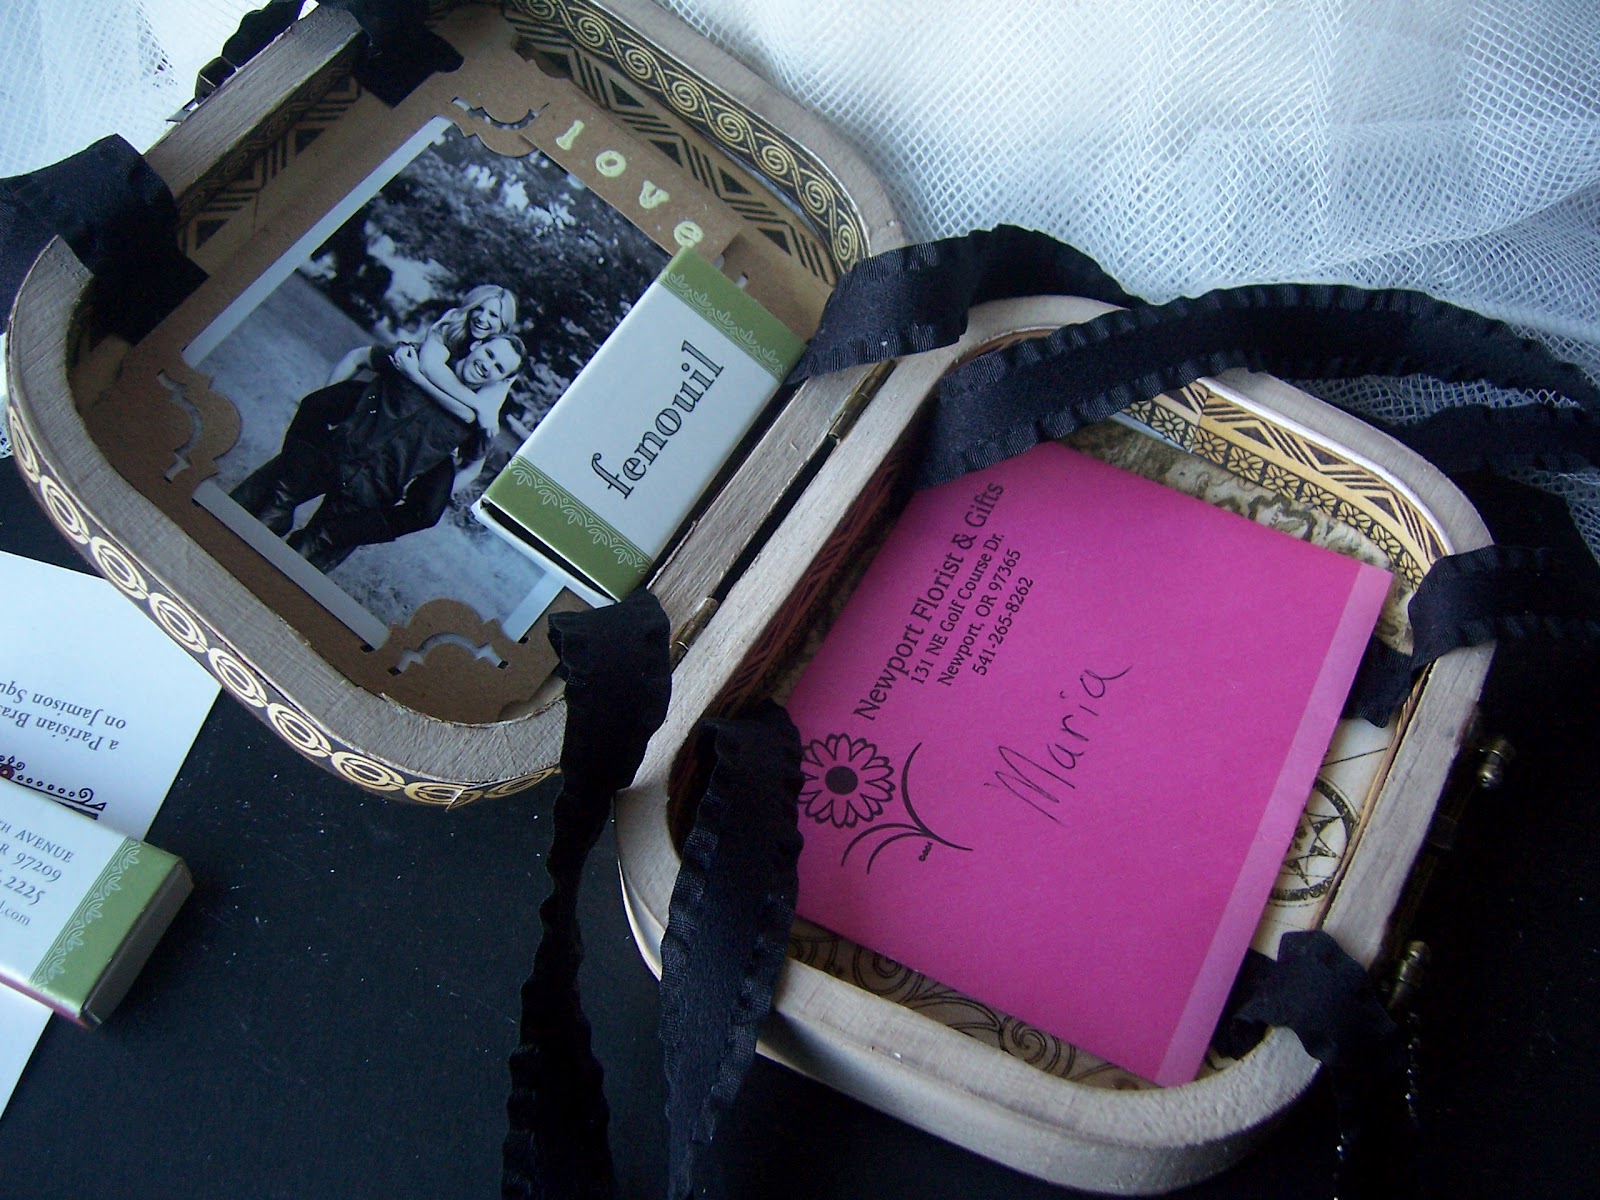
What's fun about this project is the inside ... I designed the interior to behave as a little suitcase, so you can store little trinkets and memorabilia inside, such as my Tropical Travelogue Passport. To create this little book, I used images from Exotic Destination along with some sand-colored mesh ribbon, one of many neat blog candy prizes I won from Gloria Stengel.


For the inside, I glued a couple strips of Tiki Voyager to the edges. I then cut two pieces of Jungle Fever paper and glued both pieces inside. My suitcase straps come from some black ribbon that I also won from Gloria's blog. I glued four pieces over the Jungle Fever paper. 


Lucky for me, I had just enough black ribbon so that each one could be tied with a bow!


Hmm ... I see it stores my Tropical Travelogue passport just fine ... but can it hold some other stuff? How about some matches, an envelope, and a wedding invite? Not sure if the wad of mesh ribbon will fit ... 


I think there's definitely room for the ribbon - and some more matches, some scripture pocketcards, and my passport:


Everything fits!


There you have it, an exotic little valise to store some of your favorite island memories, and a passport to match. Thank you for looking!


Supplies:

Graphic 45 - Tropical Travelogue paper
Petaloo flowers
Tim Holtz Idea-ology ball & chain
Bo Bunny trinket
Distress Ink

Monday, February 6, 2012

Grungy Monday 35: Holtz-ian ATCs

This week's Grungy Monday challenge involves creating an ATC (artist trading card) using any of Tim Holtz's signature products or techniques!

Since Valentine's Day is just a week away, I thought I'd style my ATC with a love theme using non-traditional V-Day colors. 


The background was created with one of Tim's new Texture Fade embossing folders that I picked up from Paper Mermaids. I brushed some Perfect Pearls onto the embossed cardstock then inked the edges with Black Soot Distress Ink. My flower pendant was created using Tim's Tattered Florals die and Kraft Glassine paper. After attaching the flower with a brad, I brushed some Heirloom Gold Perfect Pearls on top. The sentiment comes from an adorable Hero Arts & Basic Grey stamp set called "Kissing Booth." I inked up my Salvage Sticker and attached it to my ATC using glue and Tim's Tiny Attacher ... and for some added romanticism, I stuck some tulle (brushed with Heirloom Gold Perfect Pearls) and a feather behind my heart stamp.  


I love ATC's - they're so tiny!


Supplies: 

Perfect Pearls - Blue Patina & Heirloom Gold
Tim Holtz Texture Fades - Spring Background - Fancy Florals embossing folder
Tim Holtz Tattered Florals die
Distress Ink in Black Soot, Walnut Stain, & Rusty Hinge
Kraft Glassine paper
Tim Holtz Salvage Stickers
Tim Holtz Idea-ology Ball & Chain
Tiny Attacher
Hero Arts & Basic Grey - Kissing Booth stamps

Saturday, February 4, 2012

I'm alive! :)

Hi Crafty Friends!

Boy, am I glad to be back! So, for almost a month, I've been organizing our big move from the Oregon coast to the greater Seattle area. Organizing, packing, moving, unpacking, etc. ... Despite the crazy snowstorm that hit Seattle - and not to mention, the ridiculous high winds and flooding that pulverized the coast - my husband and I made it safe and sound to Washington. Our cellphone reception has been very spotty, and because we've been without internet for the past few weeks, getting a hold of us has not been very easy. Well, today was a fantastic day: we finally got internet service, I found out that my altered jars won the January 2012 Girlie Grunge challenge (oh my gosh, still can't believe it, thank you!!!), and I spent the entire day with my Oregon family who were visiting for the weekend. I also jumped on Twitter just now and saw that Graphic 45 is holding their 2012 Design Team call ... my little mind is spinning right now, so really, it's a great day!

Because my craft room has been boxed up the past few weeks, I don't have a project to share with you ... but I do have a photo from today's many adventures! Here's a view from Seattle at Kerry Park. My sis moved into this area over a month ago, so I know this won't be my last visit. :)


Thank you for stopping by, and I look forward to catching up on all of your creations! (It was nearly impossible trying to do it from my cellphone. Fixing our voice & 3G coverage is the next and final move-related task!)