Wednesday, November 30, 2011

Sizzix Paper Ornaments

Another goody I picked up yesterday from Paper Mermaids ... The fabulous Tim Holtz Alterations Carved Ornament die from Sizzix!

Now, I was merely playing around with this first set of ornaments ... when I have more time I'd like to emboss them and glitz/grunge up future ornaments.

I used leftover supplies from my St. Nick mini book along with a cute seahorse stamp. What I love about double-sided paper is that you have a special design on both sides of your ornament!


Let's see what they look like on a 9' Christmas tree ...


Supplies:

Sizzix Movers & Shapers - Carved Ornament die
Gathered Twig distress ink
Fancy Pants Designs - St. Nick paper
Martha Stewart snowflake punch
Baker's Twine

Christmas cards - part 4

Actually, the title of this post should be "Christmas CARD" as I've only had time to make one Christmas card the past couple of weeks. :(

This card features one of the newest Sizzix holiday dies that come with matching embossing folders. I picked it up yesterday from Paper Mermaids and can't wait to play with it more! I loved Carol's Sizzix bird card so much, that I wanted to apply the same Tattered Angels glimmer mist and rock candy accents to mine as well.

To make the tree, I first cut out the shape using French Vanilla cardstock. I then embossed it with the custom folder, inked it with Pine Needle, then applied Forest Moss distress stain all over the top. I then sprayed the tree with Pearl glimmer mist, then applied Stickles to various areas. The snowflakes also have glimmer mist and a little Rock Candy on top.


Supplies:

Sizzix tree & snowflake dies
Stickles
Rock Candy
Glimmer mist
Pine Needle distress ink
Bo Bunny - Father Christmas paper
Bazzil cardstock
Gathered Twig distress ink
Distress Stain in forest moss

Thank you card

Recently, my husband and I were blessed tremendously by his boss and his wife. We got to attend a special marriage conference in Portland where we got to learn more about one another, and to truly see our spouse as God's gift to us. To thank our friends for this wonderful opportunity, I just had to send them a card!


Supplies:

Sizzix embossing folder
Graphic 45 - Communique paper
Spellbinders Fancy Tags 2 & Labels 8 dies
Stamping Scrapping stamps

Thursday, November 24, 2011

Happy Thanksgiving!

Remember that Thanksgiving centerpiece I made a little while back? Well, here it is with actual stuff inside of it this time:


And a blurry picture, just for kicks:


Off topic, but if you're looking for a new stuffing recipe to try out next year, I highly recommend this one from Allrecipes.com. If you love things like apples, cranberries, and fresh herbs (we're talking thyme and sage), you will love this recipe!! I made it a couple years ago for a huge group and there were no leftovers! I decided to make it this year and given all the positive reviews from this year's group (my father-in-law who normally doesn't like stuffing loved this one), I think I have a new Thanksgiving tradition! That, and maybe a new name card creation each year.


I had a great time with family today, although it seems like they were here and gone in just minutes! After they left, it felt like I had a hole in my heart ... but I know that feeling will go away when I see them again next month hopefully! We had a great time sharing stories, laughing about silly things, drinking lots and lots of sparkling cider, and playing with the puppy. 

I hope that you, dear reader, are having a blessed Thanksgiving! And if it's not feeling very blessed, I pray you find some hope, encouragement, and inspiration through all the wonderful papercrafting ideas you're finding online. I'll be honest. The past couple of years have been the most trying times in my life ... but God sent me the biggest rainbow in March of this year. I walked into Paper Mermaids on a whim one day (that whim was that I was trying to earn a Foursquare badge - I know, super geeky) and was immediately struck by all the beauty around me. Shelf after shelf of gorgeous scrapbooks, cards, and papercrafting creations that Carol and Lisa created mesmerized me and instilled in me a new reason for keeping my hope alive. I started googling scrapbook designs and discovered What A Beautiful Mess. I have never seen such beautiful scrapbook pages in my life! Lisa's designs captivated me and have been a huge source of inspiration for me. Suddenly, I found something that I wanted to pour all of me into ... and I did, and I haven't looked back. 

Now, papercrafting is one of my main loves in life. It brings me joy and I love how it can bring my loved ones joy. And that is why I do it! 

So thank you ... thank you for checking out my blog and for all your sweet comments! And thank you for inspiring me. God bless you!

-Maria

Wednesday, November 23, 2011

Christmas tags - part 2

Lately, I've been tinkering with the idea of using butterflies in my Christmas projects ... there's something about whimsical creatures and Christmas! So here are some tags I made with this idea in mind:


I finally got some Rock Candy ... Paper Mermaids had it all this time; I simply didn't look close enough. It creates a soft, gorgeous, and shimmery magical sheen over your projects. My favorite cardmaker uses Rock Candy a lot on her projects -- it's where I got the idea to find some for myself!! If I had a better camera you'd be able to see it better in this photo: 


Monday, November 21, 2011

50th Anniversary Card

Here's a card I made for a friend's parents. Their 50th wedding anniversary is tomorrow and my friend Kris is putting on a tropical theme. :) I've been in a Donna Salazar kind-of-mood lately, so I thought I'd make some pink flowers with her Rose Creations die. I also used a Sizzix leaf and branch die. Makes me feel like sailing away to somewhere warm and sunny ... does such a place exist in November?? :)


Supplies:

Spellbinders - Fancy Tags & Donna Salazar Rose Creations (oops, Circles & Scalloped Circles, too)
Sizzix - Leaves & Branch die
Prima flowers
Broken China distress ink
Tiny Type

Friday, November 18, 2011

Girlie Grunge - November 2011 challenge

I am so excited ... I am officially participating in my first challenge!

Girlie Grunge is a fun website that Donna Salazar created where artists, papercrafters, and all other crafty ladies share their projects, learn cool new techniques, and take classes from designers like Donna herself! Girlie Grunge is putting on their first challenge, which is to create a card or tag using one of Donna's products, handmade flowers, and some corrugated board. I was ecstatic because I already had some leftover corrugated paper from Scott's anniversary card, plus Donna Salazar's Rose Creations Spellbinders die. Here is my submission:


First, I stamped a craft tag with some steampunk stamps, then inked the edges with some Tim Holtz distress ink. Then, I cut out several petals from my Rose Creations die using lime green Bo Bunny paper, cream cardstock, and white cardstock. I inked each petal, crumpled them up a bit, then applied glitter and glimmer glass along the edges.


For the leaves, I used my Rose Creations die to cut out the two biggest leaf patterns. I inked them, stamped them, then crumpled them up as well.


I distressed the corrugated board by ripping the edges with a nail file and my hands (um, Distress-It-All for Christmas if you're reading this, hon?) then applied my favorite crochet ribbon on top. That as well was distressed by ripping the ends of the ribbon.


And this gorgeous ribbon was a little "Thank you" goody I received Etsy ... thank you, Karen from Creative Seconds!!


There you have it, ladies!! Can't wait to see what the other ladies from Girlie Grunge come up with! I'll be gone all weekend (taking some time out with the hub) so you have a wonderful, blessed, crafty weekend!! 


Supplies: 

Craft tag
Donna Salazar Rose Creations die
Tim Holtz distress ink
Glimmer Glass
Corrugated board
Steampunk stamps

Thursday, November 17, 2011

Christmas tags - part 1


Christmas cards - part 3

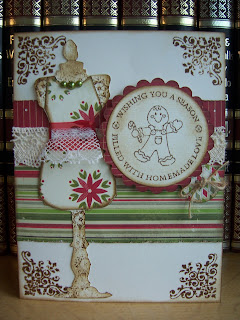
Here is my latest set of Christmas cards.


Sorry for the blurriness on my last picture! The sentiment on the last card reads: "May the spirit of the season put a sweet song in your heart."I think Santa needs to drop off a new camera this year ... in addition to a Zutter Distrezz-It-All ... and a Crop-a-dile ... and Spellbinders Labels 20 die ... and some more JustRite stamps ... and ... :)

Supplies:

Authentique - Wonder paper
Sizzix - Sewing Room die
Spellbinders - Fleur de Lis, Circles, Scalloped Circles, Ovals, & Lacey Ovals dies
JustRite Stampers - Seasoned With Love
Cuttlebug - Script die

Tuesday, November 15, 2011

Thanksgiving Name Cards & Tutorial

I love Thanksgiving ... and I love how both my side of the family and my husband's are getting together this year! My family from Portland will be joining us here on the coast this year, so to add to the special-ness of this event, I thought I'd make some name cards for our Thanksgiving dinner.


These little name cards are really easy to make. And no matter where you are, you have plenty of time to run to your local scrap store for supplies, or rummage through your own scrap drawer! I got all my paper and embellishments from Paper Mermaids last week, so if you happen to live in town and need some guidance, drop me a line and I'd be happy to help you pick out Thanksgiving colors and embellishments at Paper Mermaids!


To make 12 name cards, here's what you'll need:

*3 pieces of cardstock - preferably 1 dark brown, 1 deep orange, and 1 ivory
*1 piece of orange pattern paper
*12 mini flowers - Prima ones such as these are perfect
*Dark brown, orange, and red inks
*Dark brown pen
*1 foot of twine
*A script stamp, such as the one in this Tim Holtz set
*A corner punch of your choice, such as this Fiskars 3-in-1 punch
*Sizzix "Autumn Gatherings" die, or, use silk leaves no larger than 1"
*Spellbinders - Labels 4 die
*Glossy accents
*Stickles
*Crackle accents
*Liquid pearls

The leaves
1. Cut two 3" x 12" strips of your ivory cardstock using a paper trimmer or scissors.
2. Run each strip of paper through your die cutting machine, using the Autumn Gatherings die.
3. Ink your leaves in different colors, such as red, orange, and brown.
4. Take one half of your red and orange leaves and set aside.
5. With your other half of red and orange leaves, grab your script stamp, apply some brown ink to it, and stamp over your leaves. When these have dried, apply Crackle Accents on top.
6. For the other half of leaves, apply glossy accents to the top. After these have completely dried, apply Stickles on top.

The base
1. Take your brown cardstock and cut (12) 4" x 2 3/4" pieces of paper.
2. Use your corner punch and punch each corner of the 12 brown strips you just cut.
3. Fold each brown strip in half; set aside.

The sentiment piece
1.Take your patterned cardstock and cut 6 pieces using the 2¼" x 3⅝" size Spellbinders Labels 4 die. Once cut, use a paper trimmer or scissors to cut your labels in half - you will now have 12 pieces. Ink each one and set aside.
2. Take your orange cardstock and cut 6 pieces using the 1¾" x 3⅛″ size Spellbinders Labels 4 die. Once cut, use a paper trimmer or scissors to cut your labels in half - you will now have 12 pieces. Ink each one and set aside.
3. Glue a piece of your orange cardstock that you cut onto a piece of patterned cardstock, making sure the cut side of the orange paper is flush with the cut side of the pattern paper. Do this for the remaining 11 pieces of orange and pattern paper.
4. In the center of your orange cardstock, handwrite "Blessed by ... (name)" using your brown pen. I like to change things up, so I also used "Grateful for" and "Thankful for". If you have a custom stamp set that is tiny enough to fit, you can stamp your sentiment instead!

Assembling your name cards
1. Begin with your brown cardstock pieces and your Prima flowers. If your flowers come in a little bundle, remove the flowers by cutting their metal stems about 3/4" long from the flower. Glue the flower and its stem onto 8 of your 12 pieces of brown cardstock. Leave the other 4 pieces of brown card stock without the Prima flower for now.
2. Glue your orange cardstock and patterned paper onto the brown cardstock, so that the metal stem of the Prima flower is covered.
3. Create one of three patterns: Sparkly leaves, Crackled leaves, and Pearls.
3a. Sparkly leaves: Take a brown leaf and one of your leaves that you applied Glossy Accents and Stickles to. Glue these next to the Prima flower on your name card. Tie a small piece of twine around the flower.


3b. Crackled leaves: Take a brown leaf and one of your leaves that you applied Crackled Accents to. Glue these next to the Prima flower on your name card.


3c. Pearls: Glue a prima flower at the bottom tip of your orange cardstock & patterned paper. Tie a piece of twine around it and make a bow. Grab some liquid pearls and outline the inside of the orange cardstock. Let name card dry completely before handling!


If you don't have all these supplies, no worries! You can always substitute them for something you have on hand. Or, just drop by your local craft store and hand them my list of supplies! For the sentiment piece of the name card, you can switch out the Spellbinders Labels 4 die for any other label die you have. Or, you can cut a rectangle shape ... or, this is pretty, you could use a doily and distress it with some orange ink!


Thanks for stopping by!

Sunday, November 13, 2011

Steampunk Tag

Tags are so much fun to make because the possibilities are endless! Here's one I made for a friend of mine recently:


Supplies:

Graphic 45 - Steampunk Debutante paper
Prima flowers
Kaiser craft tag

Saturday, November 12, 2011

Hair Stylist Tim Holtz configuration box

Today is my friend's birthday, and because she's a hair stylist, I thought I'd add to Maggie's work area by making her a Tim Holtz box.


When I made my first configurations box earlier this year, I had an extra set of mini scissors afterwards. These fit perfectly with my friend's hair stylist theme. :) 


Supplies:

Tim Holtz configurations box
Graphic 45 - Fashionista paper
Sizzix - Rosette die
Stickles

Wednesday, November 9, 2011

Christmas cards - part 2

So what's your opinion on non-traditional Christmas cards? You know, ones that aren't your typical red, green, and white? I personally think they're a little refreshing ~ they're a fun twist to the usual holiday color palette. Well, here are some Christmas cards I made using brown, orange, blue, and lime green ... I kinda like how they turned out!


You can't really see it, but the yellow Stickles I applied to the brown snowflake look sooo pretty! You should try it on one of your next creations. And throw on Mindy Smith's "My Holiday" CD while you're at it. :)


Supplies:

Summer's End paper
Sizzix ornament die
Martha Stewart punch
Spellbinders - Fleur de Lis motifs & Labels 8 (4? 2?) dies
Sizzix - Regal Flourishes embossing folder
Cuttlebug - Swiss Dot embossing folder
Bazzil cardstock
Stickles