Thursday, October 31, 2013

Happy Halloween! And a layout, too!

Happy Halloween, everyone!

Are you ready for all the trick-or-treaters? Sadly, the Halloween candy did not last - so ... it looks like another trip to the store so all those kiddos are happy!

Today on Graphic 45's blog, you can see a couple fun Halloween projects that Miranda and I made! I won't spoil what Miranda made, so feel free to head over to see her beautiful Halloween home decor project.

And here's mine, a layout made with Place In Time, Steampunk Spells, and even a little Mother Goose. I also used a lovely Petaloo flower and foliage, along with some of my favorite Spellbinders dies!


Supplies


Graphic 45 Metal Brads
Core’dinations Bordeaux (Purple)
Core’dinatinons Photogenic (Black)
Spellbinders Rose Creations die
Spellbinders Fantastic Flourish 2 die
Spellbinders Gilded Gate 2 die
Petaloo Mini Daisies - Greys/Blacks
                                                                                 Petaloo Foliage
Petaloo Daisies - Greys/Blacks


That's all, ladies and gents ... have a hauntingly fun Halloween!!

Maria

Thursday, October 24, 2013

12 Days of Christmas Stacking Boxes Tutorial

Good Morning!

If you've been following the Graphic 45 blog this week, I'm sure you've seen some spectacular creations made by the design team! We teamed up with Scor-Pal this week to create some fun and festive projects using G45 papers and Scor-Pal products.

Today, Anne, Clare and I are on the G45 blog - go check it out! If you leave a comment on the blog or Facebook page, you could win a beautiful 12 Days of Christmas prize pack that also includes some amazing Scor-Tape! Then, be sure to go to Scor-Pal for even more inspiration -- there are some adorable projects over there! :)

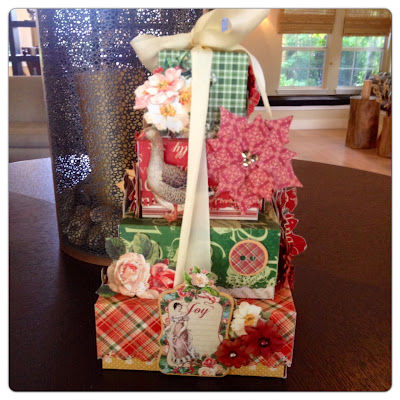
Here's my project I made for the blog hop:


Want to make your own stack of Christmas boxes?? Here's my tutorial on how to make your own:


12” x 12” Golden Rings
12” x 12” 12 Days of Christmas
12” x 12” My True Love
(2) 12” x 12” Pear Tree
12” x 12” Drummer’s Drumming
12” x 12” Christmas Rose
12” x 12” Swans A Swimming
12 Days of Christmas 6x6 Patterns & Solids Pad
12 Days of Christmas Chipboard Die-cuts 1
1 yard pale yellow silk May Arts Ribbon
Petaloo Darjeeling Mini Mix – Teastaine
Martha Stewart Doily Edge Punch
ZVA Crystals
Scor-Pal
Scor-Tape

Instructions


Step 1. Assemble 5” x 5” box bottom
Cut Golden Rings to 9” x 9” per photo. Score at 2” on each side. Make one cut on each side of your paper, up to the point where your score lines meet. Apply Scor-Tape to ends, then fold to create the base for your box.

Step 2. Assemble 5” x 5” box lid
Cut 12 Days of Christmas to 8 5/8” x 8 5/8” per photo. Score 1.75” on each side. Before cutting, apply your favorite edge punch along each side. For this project, I used Martha Stewart’s Doily Edge punch. Make one cut on each side of your paper, up to the point where your score lines meet. Apply Scor-Tape to ends, then fold to create the lid for your box. Place lid on top of bottom.

Step 3. Assemble 4” x 4” box bottom
Cut My True Love to 8” x 8” per photo. Score at 2”, make cuts, apply Scor-Tape, then fold.


Step 4. Assemble 4” x 4” box lid
Cut Pear Tree to 7 5/8” x 7 5/8” per photo. Score at 1.75”, punch around the edges, make cuts, apply Scor-Tape, then fold. Place lid on top of bottom.


Step 5. Assemble 3” x 3” box bottom
Cut Drummer’s Drumming to 7” x 7” per photo. Score at 2”, make cuts, apply Scor-Tape, then fold.


Step 6. Assemble 3” x 3” box lid
Cut Christmas Rose to 6 5/8” x 6 5/8” per photo. Score at 1.75”, punch around the edges, make cuts, apply Scor-Tape, then fold. Place lid on top of bottom.


Step 7. Assemble 2” x 2” box bottom
Cut your other piece of Pear Tree to 6” x 6” per photo. Score at 2”, make cuts, apply Scor-Tape, then fold.


Step 8. Assemble 2” x 2” box lid
Cut Swans A Swimming to 5 5/8” x 5 5/8” per photo. Score at 1.75”, punch around the edges, make cuts, apply Scor-Tape, then fold. Place lid on top of bottom.
Step 9. Stack boxes, with the 5” x 5” box on the bottom. Adhere. Take your ribbon and tie around your stack of boxes, creating a bow on top.

Step 10. Use your 12 Days of Christmas 6” x 6” Patterns & Solids pad and a flower die, such as the Spellbinders Poinsettia die to create some dimensional flowers for your boxes. 
Step 11(Front) From your scraps, fussy cut and adhere a swan, hen, and roses. Adhere large piece from Christmas Chipboard Die-cuts 1, some red Petaloo flowers, and your die cut poinsettias. 
Step 12(Right side) Fussy cut and adhere some flowers and lords and ladies dancing. Adhere button and tag from Christmas Chipboard Die-cuts 1 and some red Petaloo flowers.


Step 13. (Back) Fussy cut and adhere some flowers and goose. Adhere button and tag from Christmas Chipboard Die-cuts 1, some red Petaloo flowers, and your die cut poinsettias.
Step 14. (Left side) Fussy cut and adhere some flowers, pears, and turtle doves. Adhere button and tag from Christmas Chipboard Die-cuts 1 and some red Petaloo flowers.

Step 15. To make some stand alone 2” x 2” boxes, use various papers from your 12 Days of Christmas 6” x 6” Patterns & Solids pad. Just remember that the bottom paper measures 6” x 6” and needs to be scored at 2” all the way around, and the lid paper needs to be trimmed to 5 5/8” x 5 5/8” and scored at 1.75” all the way around. 


Friday, October 11, 2013

October Layout Tutorial

Happy Friday!

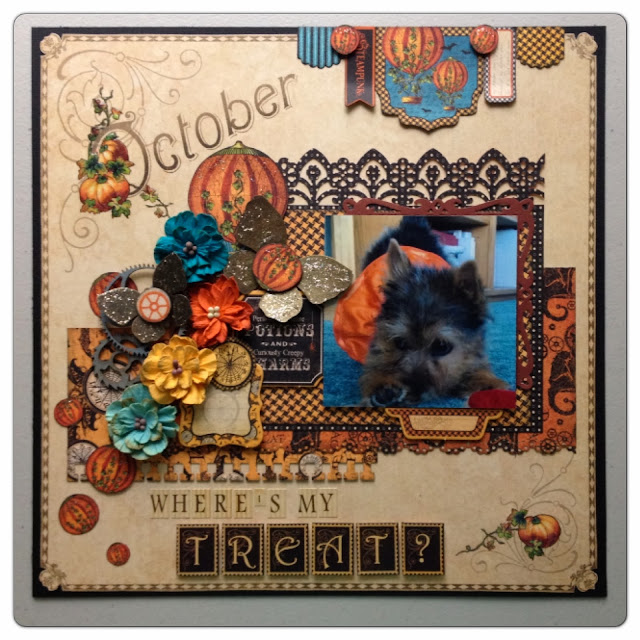
I wanted to share a layout of mine that was shared on the Graphic 45 blog this week. :) I used Graphic 45's Place In Time and Steampunk Spells paper to create this layout of my in-laws adorable little Norwich Terrier, Rosie. If you scroll a little further, I have a step-by-step tutorial on how to make it!


"Where's My Treat?" October Layout Tutorial

12” x 12” Place In Time October Foundation
12” x 12” Steampunk Spells Beware
8” x 8” Steampunk Spells Pumpkin Power
8” x 8” Steampunk Spells Tick Tock
Steampunk Spells 6x6 pad
Steampunk Spells Banners
Steampunk Spells Chipboard
Graphic 45 Metal Butterflies
Place In Time Alphabet Stickers
Petaloo Dahlias – Aquas, Autumn
Petaloo – chipboard gears
Core’dinations – Photogenic (Black)
Spellbinders Captivating Squares
Stickles – Platinum
Ranger Glossy Accents

Step 1. Fussy cut the edge of your 12” x 12” October Foundation, then adhere on top of black cardstock.


Step 2. Cut Beware paper to 8.5” wide x 4” tall. Apply your favorite border punch along the bottom.

Step 3. Take a black polka dot pattern from your 6x6 pad. Apply a border punch to the top, such as Martha Stewart’s Garden Gate punch. Next from your 6x6 pad, take your darkest solid orange pattern and use a die like Spellbinder’s Captivating Squares to cut a 4.25” x 4.25” square.

Step 4. Take your Tick Tock paper and cut (1) 6.5” x 3.5” and (1) 6.5” x 4.5”. Use a border punch along the bottom of your 3.5” tall piece and use the clock side. Flip your 4.5” tall piece over to reveal hounds tooth pattern. 

Step 5. Gather a small and large metal butterfly, some Petaloo Dahlias, Steampunk Spells chipboard pieces, Steampunk Spells banners, and (2) chipboard gears such as these ones from Petaloo. From your Pumpkin Power paper, fussy cut (1) large pumpkin hot air balloon. Fussy cut just the pumpkin part for (4) medium-sized pumpkins and (3) small pumpkins.

Step 6. Arrange all your paper onto the layout. Adhere once you’re happy how things look! Trim your photo to a 4” square and adhere using foam dots.

Step 7. Adhere banners to upper right. Attach small fussy cut pumpkins with foam dots.

Step 8. Adhere your embellishments per photo. Use Place In Time alphabet sticker sheet to create the phrase “Where’s my treat?” (Use a #1 sticker for the apostrophe.) Optional: apply glossy accents to pumpkins in upper left and lower right corners. Apply Platinum Stickles to butterflies and fussy cut pumpkins.

Wednesday, October 2, 2013

Steampunk Spells Tag Graveyard

Good Morning!

If you love Halloween, and just October in general, you will love today's blog post at Graphic 45! My fun little project below is featured, along with my fellow DT team member Anne Rostad and her fantastic mini album tutorial.

The amazing chipboard pieces in my project are from Gina's Designs. The gothic design goes perfectly with Halloween, and so does Graphic 45's Steampunk Spells collection! I also used some Petaloo flowers and even one of Tim's Halloween adornments.


The chipboard gears are from Gina's Designs, too! My "crosses" are Graphic 45 metal keyholes turned upside down.


That is all, ladies and gents! Thanks so much for stopping by!