Happy Friday!
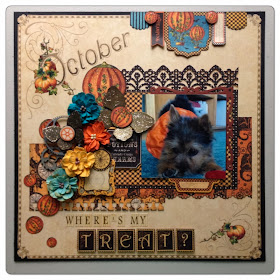
I wanted to share a layout of mine that was shared on the Graphic 45 blog this week. :) I used Graphic 45's Place In Time and Steampunk Spells paper to create this layout of my in-laws adorable little Norwich Terrier, Rosie. If you scroll a little further, I have a step-by-step tutorial on how to make it!
Step 2. Cut Beware paper to 8.5” wide x 4” tall. Apply your favorite border punch along the bottom.
Step 3. Take a black polka dot pattern from your 6x6 pad. Apply a border punch to the top, such as Martha Stewart’s Garden Gate punch. Next from your 6x6 pad, take your darkest solid orange pattern and use a die like Spellbinder’s Captivating Squares to cut a 4.25” x 4.25” square.
Step 4. Take your Tick Tock paper and cut (1) 6.5” x 3.5” and (1) 6.5” x 4.5”. Use a border punch along the bottom of your 3.5” tall piece and use the clock side. Flip your 4.5” tall piece over to reveal hounds tooth pattern.
Step 5. Gather a small and large metal butterfly, some Petaloo Dahlias, Steampunk Spells chipboard pieces, Steampunk Spells banners, and (2) chipboard gears such as these ones from Petaloo. From your Pumpkin Power paper, fussy cut (1) large pumpkin hot air balloon. Fussy cut just the pumpkin part for (4) medium-sized pumpkins and (3) small pumpkins.
Step 6. Arrange all your paper onto the layout. Adhere once you’re happy how things look! Trim your photo to a 4” square and adhere using foam dots.
Step 7. Adhere banners to upper right. Attach small fussy cut pumpkins with foam dots.
Step 8. Adhere your embellishments per photo. Use Place In Time alphabet sticker sheet to create the phrase “Where’s my treat?” (Use a #1 sticker for the apostrophe.) Optional: apply glossy accents to pumpkins in upper left and lower right corners. Apply Platinum Stickles to butterflies and fussy cut pumpkins.
I wanted to share a layout of mine that was shared on the Graphic 45 blog this week. :) I used Graphic 45's Place In Time and Steampunk Spells paper to create this layout of my in-laws adorable little Norwich Terrier, Rosie. If you scroll a little further, I have a step-by-step tutorial on how to make it!
"Where's My Treat?" October Layout Tutorial
12” x 12” Place In Time October
Foundation
12” x 12” Steampunk Spells Beware
8” x 8” Steampunk Spells Pumpkin
Power
8” x 8” Steampunk Spells Tick Tock
Steampunk Spells 6x6 pad
Steampunk Spells Banners
Steampunk Spells Chipboard
Graphic 45 Metal Butterflies
Place In Time Alphabet Stickers
Petaloo Dahlias – Aquas, Autumn
Petaloo – chipboard gears
Core’dinations – Photogenic (Black)
Spellbinders Captivating Squares
Stickles – Platinum
Ranger Glossy Accents
Step 1. Fussy cut the edge of your 12” x 12” October Foundation, then adhere on top of black cardstock.
Step 2. Cut Beware paper to 8.5” wide x 4” tall. Apply your favorite border punch along the bottom.
Step 3. Take a black polka dot pattern from your 6x6 pad. Apply a border punch to the top, such as Martha Stewart’s Garden Gate punch. Next from your 6x6 pad, take your darkest solid orange pattern and use a die like Spellbinder’s Captivating Squares to cut a 4.25” x 4.25” square.
Step 4. Take your Tick Tock paper and cut (1) 6.5” x 3.5” and (1) 6.5” x 4.5”. Use a border punch along the bottom of your 3.5” tall piece and use the clock side. Flip your 4.5” tall piece over to reveal hounds tooth pattern.
Step 6. Arrange all your paper onto the layout. Adhere once you’re happy how things look! Trim your photo to a 4” square and adhere using foam dots.
Step 7. Adhere banners to upper right. Attach small fussy cut pumpkins with foam dots.
Step 8. Adhere your embellishments per photo. Use Place In Time alphabet sticker sheet to create the phrase “Where’s my treat?” (Use a #1 sticker for the apostrophe.) Optional: apply glossy accents to pumpkins in upper left and lower right corners. Apply Platinum Stickles to butterflies and fussy cut pumpkins.


This came just adorable! Love that pic, and the colors are wonderful, love them :) Great work Maria!
ReplyDeletePaula
Although several days late, I wanted to stop by to thank you for this cheerful and sweet layout (which I originally saw at the G45 blog). I can't stop looking at it and smiling and will attempt my own version of it (cute dog replaced with neighbor's cat)!
ReplyDeleteDanielle
Adorable! Great layout, Maria. That sweet pup must be so loved. Love all your layers and flowers!
ReplyDeleteMaria, what a beautiful layout! That little doggie is so cute! Love all the stunning embellies! Hugs, Sandra
ReplyDelete